
Here are some useful tips to help you setup and configure CleanFlight on Naze32. If you have been using Baseflight, please jump and read “Migrating from BaseFlight” section first. If you are a complete new user, just read on. If you have any questions I haven’t mentioned, please leave me a comment. (This post is primarily written for Naze32, but most of the information also applies to CC3D To see how to flash Cleanflight on CC3D, check out this post).

Some of the links on this page are affiliate links. I receive a commission (at no extra cost to you) if you make a purchase after clicking on one of these affiliate links. This helps support the free content for the community on this website. Please read our Affiliate Link Policy for more information.
There are many reasons why you should change over from Baseflight. For more tips on using the Naze32, or explanation of certain parameters, check out the Naze32 Guide.
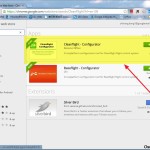
Same way as getting the BaseFlight Configurator, you just search for “CleanFlight” in Extensions in Google Chrome. If your existing CleanFlight GUI version is out of date, you can just remove it and re-download it.
If you have already used Naze32 before, you probably have installed the driver. But if you are new, or you are using a new computer that never has connected a Naze32 before, you will have to install the Driver first. Otherwise your board is not recognised and it won’t be assigned a COM port.
There’s a link for the driver right in the Cleanflight GUI , but in case you can’t find it, here is the driver download address.
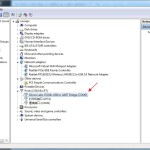
Once the driver is installed successfully, you should see this in your device manager, with a COM port number assigned. If not, try to restart your computer first.
When you open the CleanFlight GUI, you will notice it won’t connect no matter how hard you press the “connect” button. That’s because your Naze32 is still on BaseFlight, so we need to flash CleanFlight firmware on the Naze32 and CC3D first. Even when you have already had CleanFlight flashed, you might still want to do this again in the future for the latest firmware update (the extra features and bug fixes). Note that you will need an USB-UART adapter for the CC3D before flashing.
* Please note that firmware is reverse-able, you can always go back to BaseFlight if you want.
Firmware flashing is really simple and straight forward. Open the Configurator GUI, choose the COM port for your board. Then go to “Firmware Flasher”.

In the list of available firmware are for different boards. I would personally choose the latest Stable version.

And now press “Load Firmware (Online)”, the release information will appear. You may want to check “Full Chip Erase” for new boards.

Now double check you have selected the correct firmware, and press “Flash Firmware”.

LEDs on your Naze32 or CC3D will start blinking, when it finishes flashing firmware, the LED will stay on solid again. This will take less than a minute.
Now, try to connect your board in the CleanFlight GUI, taadaa! It works! :D

Some people might accidentally flash the wrong firmware (e.g. flashed CC3D version on the Naze32), and you can’t talk to the board anymore. Simple fix is to short the bootloader pads on the board, and check “No Reboot Option” and “Flash on connect” (only appear when the first option is checked). Then load the correct firmware and flash again.
There are two aspects you should know if you are a BaseFlight user and changing over to CleanFlight. First, the steps to migrate your settings over. Second, you should be aware of the differences in some CLI commands. Original document is here. Here is the summary.
1. Before flashing CleanFlight, you want to backup your settings (PID values, CLI variables etc).
2. Disconnect battery, connect USB cable to power the board.
3. In CLI command, dump your configs for each profile, and save to text file.
profile 0 dump profile 1 dump profile 2 dump
Also take screenshots of your AUX settings so you can set it up in CleanFlight later, note that AUX settings are not backwards compatible.
After flashing CleanFlight, paste the output of your first profile into CLI.
As mentioned, some CLI commands have been changed in Cleanflight, and you will notice some commands are not recognised by CleanFlight. To solve that, look up the new configuration options and choose appropriate values for the settings.
Once done, save the config, and verify your config is OK, e.g. features serial ports, etc. Finally, repeat the same process for the other profiles.
CLI command is the ultimate tool for configuring the Naze32. There are many parameters you can play with, to find out type “DUMP” and press enter, a huge list will return. There are quite a lot of changes to the commands in CleanFlight (mainly added underscore “_” in some of them).

Here are the ones I have used. There are also GPS features, but since I don’t use GPS yet I won’t talk about it for now.
If you are wondering why looptime is 2500 and Acc_lpf_factor is 100, check out my explanation on Naze32 Guide.
Update 20 April 2015: Looptime – I am now using Oneshot on my Blue Series ESC, with PID controller 2, I am able to lower looptime to 1200. :D (the lowest it can go) it flies like a dream!
After configuring the features and parameters, type ‘SAVE’ to save settings.
Some other throttle commands.
MIN_COMMAND – lowest throttle value the flight controller can use, you should set it to the lowest value of your throttle. Note: When the FC is not armed, it will by default use the value of MINCOMMAND if your throttle is lower than MAXCHECK. You can use this command to simulate a max and min throttle signal, to calibrate ESCs. Default is 1000.
MIN_THROTTLE – the lowest throttle value that turns the motors on. If this number is set lower than the motors can reliably spin, it can cause the motors to stop spinning when hard yawing or during quick flips and rolls. This would cause loss of stability and control. Default is 1150.
MAX_THROTTLE – Your full throttle setting. Should match what your ESCS are calibrated for. Can be set a little lower if you want to have room for the motors to maintain balance and adjust speed at full throttle.
MAX_CHECK – Throttle must reach this number for stick commands while disarmed. Keep mincheck and maxcheck close to the endpoints of your throttle.
MIN_CHECK – When armed, if your throttle pass this value, MINTHROTTLE will be used instead, and motor will start spinning.
Note: If motor_stop is not enabled – motors will spin and idle at MINTHROTTLE speed when armed but will not react to changes until MINCHECK is reached.
Alternatively you can also use CLI commands to do so.
REMOVE PROPELLERS before working with the quadcopter. You’ve been warned.
For some reason, my radio is not working for calibrating ESCs, so I have to use the CLI tool in the baseflight GUI. It’s just equally handy.
DISCONNECT Lipo Battery, then type command in CLI:
set min_command=2000
Hit enter and type save.
Now disconnect USB cable to power off the flight controller. Power up the Naze again by plugging in the Lipo, and then the USB cable. After bootup go back to CLI and type:
set min_command=1000
Now enter “save” and you should hear a musical tone from the motors, which means all ESC’s are calibrated.
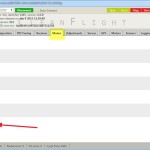
To check if the calibration was successful, go to “Motors” tab, and check if each motor spins to the same input value. (Remember do not mount your probs when doing this test.)
Autotune is a new feature in CleanFlight ported from Bradwii, which allows the copter to automatically find the “most suitable” PID settings. The idea of it is that Naze32 will keep increase P gain, if the quad goes up / down and overshoots, it will be detected and P will be adjusted. Here is the document explains what Autotune is in more detail.
Autotune exists as a flight mode in the configurator GUI. To enable Autotune, you first need to assign it a AUX switch, and you can activate it in the air.
Autotune basically gives full control of your quadcopter to the flight controller, and it will carry out a series of tuning cycles, perform all sorts of movements to determine the “best” PID settings. As it gets further into the tuning cycle, movement can be quite large and harsh, so make sure you do this in a big open field, without people / property around. You should interrupt and disable autotune (by flipping the flight mode switch), if it’s getting unsafe. Also some people suggest a full tuning session is not necessary.
I think Autotune is a great tool for someone who are not comfortable with PID tuning, or not happy with the PID settings they have now. But in a recent CleanFlight talk (Nov 2014), Dominic (who started Cleanflight) admitted that “Autotune is not particularly useful yet”, and “Autotuning needs tuning”. I suppose this is still a very early stage for this advance feature, and we should see more improvement in the near future.
More tips on Autotune coming soon.
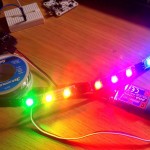
One of the reasons that I wanted to try CleanFlight was because it supports RGB LED. A particular type of RGB LED strip is recommended, WS2812. I happened to have some lying around so it was perfect to test it with CleanFlight. I think setting this up could be quite confusing for some people, so I have written a page on how I setup my LED strip with CleanFlight.
CleanFlight inflight PID tuning allows you to adjust your rates and PID gains using your radio transmitter swtiches and pots, even when you are in the middle of flying.
Before that, to adjust PID values, we usually have to land, disarm, and connect your flight controller board (Naze32, CC3D etc) to the computer, and do it in the configurator. Or, the easiest way was to connect a bluetooth module on the Naze32, and adjust the value from an Android App on your smartphone.
Although it’s now super simple to change your PID and rates, it still need to take this slowly and carefully. Changing rates and PID during flight can cause the quadcopter unstability, and you may crash.
The original documentation is very clear how this can be setup. If you have anything unclear about please let me know.
Cleanflight now has 3 built-in pid controllers which you can choose to use. They offers different flight behaviours and takes different PID gains. Here is a quick post to explain the differences of PID controller 0, 1 and 2 in Cleanflight.
Blackbox feature allows you to save your flight data on a SD card via a serial port. You can then either convert the data into CSV files or render them into PNG files, so you can review your flight performance, tune your aircraft, or troubleshoot problems.
Here is a Blackbox Setup guide for Naze32.

Since CF is a fork of Baseflight, I think the performance should be similar if not better. I will do some test flights and work out the best PID tuning for my quad, once the weather gets better. For now, please refer to my Naze32 Setup guide for PID settings. (link at the top of this page)